Halloween Reipes
Trick or treat! Halloween can be a fun and scary time of the year. If you are hosting a Halloween party this year, check out our recipes below for easy, fun and delicious treats. You can also download all our treats in a free recipe book below. Just click on the links.

Frankenstein Rice Krispie Treats
You Will Need:
-
3 tablespoons butter
-
10 ounces marshmallows
-
6 cups rice krispie cereal
-
10 drops yellow food coloring
-
10 drops blue food coloring
-
Melted Chocolate/Candy Coating
-
Candy Eyes
Step 1
Melt the butter in a large pot and add the marshmallows. Stir until they are all melted. Add in the food coloring and stir until it turns green. Add rice krispie cereal a little bit at a time and stir to combine.
Step 2
Press rice krispie cereal into a buttered 9 x 13 pan. Press flat and let cool. Let rice krispie treats sit for about 30 minutes. Remove from pan and cut into squares.
Step 3
Melt Chocoalte according the package directions. Dip the tops of the Rice Krispie Treats into the melted chocolate. Lay on a sheet of wax paper (or a plate).
Step 4
Use some of the melted chocolate and \”glue\” on the candy eyes. Fill a ziplock bag with some of the melted chocolate, snip an end off and pipe a stitch mouth onto Frankenstein. Let the Frankenstein Rice Krispie Treats sit for about 20 minutes undisturbed or until the chocolate had hardened. Serve.


Strawberry Ghosts
You Will Need:
-
1 (16 oz) package Vanilla CANDIQUIK Coating
-
24 Fresh strawberries
-
Mini chocolate chips
Step 1
Melt Candiquik in tray according to directions on package.
Step 2
Place a large piece of wax or parchment paper on a flat surface.
Step 3
Dip strawberries in melted Candiquik Coating, remove and allow the excess coating to pour off onto the wax paper to form the “tail” of the ghost; slide the strawberry back and set on wax paper to dry.
Step 4
Before coating has set, place two mini chocolate chips on as the eyes. For the mouth, cut off the tip of a mini chocolate chip and place on the strawberry with the bottom side facing up. Serve.
Pumpkin Oreos
You Will Need:
-
OREOS
-
Orange Candy Melts
-
Green Steam Sprinkles or Mini M&Ms
-
Candy Eyeballs
-
Black Frosting Writer
-
White Jimmy Sprinkles
Step 1
Melt your orange candy melts according to packaging. Dip each Oreos in melts until all covered.
Step 2
Set out on parchment or wax paper and add candy eyeballs and green stem. Let set.
Step 3
Pipe on black frosting for mouths and add white jimmy sprinkles as teeth. Let set. Serve.


Dark Candy Apples
You Will Need:
-
6 Red Delicious apples
-
3 c. sugar
-
1 c. water
-
1/2 c. light corn syrup
-
1/2 tsp. cinnamon-flavored oil
-
1/4 tbsp. red food coloring
Step 1
Remove stems and skewer apples
Step 2
In a saucepan over high heat, with a candy thermometer attached, heat sugar, water, and light corn syrup, stirring until sugar dissolves.
Step 3
Bring to a boil until mixture reaches 300 degrees F. Remove from heat, and stir in 1/2 teaspoon cinnamon-flavored oil and 1/4 tablespoon red food coloring.
Step 4
To make red apples: Dip apples, one at a time, then transfer to a greased baking sheet. Let cool, about 10 minutes.
Step 5
To make black apples: Add 1/4 tablespoon black food coloring to your red syrup. (If the syrup has thickened, reheat briefly.) Dip apples, one at a time, then transfer to a greased baking sheet. Let cool, about 10 minutes. Serve.
Meringue Ghost Tartlets
You Will Need:
-
12 baby Granny Smith apples
-
12 wooden candy apple sticks or dowels
-
1 1/2 c. sugar
-
1/2 c. light corn syrup
-
1 tsp. black gel paste food coloring
Step 1
Wash and dry apples thoroughly. Place on a baking sheet and poke firmly with dowels. Line a second baking sheet with buttered parchment paper, and set aside.
Step 2
Place a candy thermometer in a medium saucepan and add sugar, 3/4 cups water, and corn syrup. Place over medium heat; whisk until sugar is dissolved. Let the temperature rise without stirring until it reaches the hard-crack mark at 310 degrees F. Remove pan from heat. Carefully remove thermometer, and add food coloring.
Step 3
Swirl pan to mix in the color completely. Swipe and twirl the apple through the candy, shake off excess, and place on buttered baking
Mummie Cookies
You Will Need:
-
Vienna Fingers (Vanilla Cookies)
-
White Candy Coating
-
Mini M&Ms
Step 1
Begin by melting candy coating as directed on package.
Step 2
Place cookie in melted candy using a fork and making sure all sides are coated. Set on waxed paper and repeat for all cookies.
Step 3
Let candy coating set (in the fridge for half hour) or on the counter for at least 1 hour.
Melt more candy coating and place in a ziploc bag. Snip edge and drizzle over cookies. Add mini M&Ms as eyes. Let set. Serve.

Boo-nilla Ghost Milkshakes
You Will Need:
-
For the milkshake:
-
4 c. vanilla bean ice cream
-
1½ - 1¾ c. whole milk
-
2 tsp. vanilla extract
-
For the topping:
-
1 c. heavy cream
-
3 tbsp. powdered sugar
-
½ tsp. vanilla extract
Step 1
In a blender, combine the ice cream, milk and vanilla extract. Blend until smooth.
Step 2
In a medium size mixing bowl with a hand mixer or in the bowl of a stand mixer, beat the heavy cream, powdered sugar and vanilla extract until stiff peaks form.
Step 3
Divide the milkshake between the glasses. Cut the corner of a large ziploc bag and pipe a swirl on top. Serve immediately.


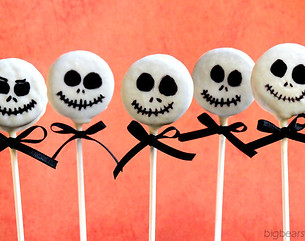
Jack Skellington Oreo Pops
You Will Need:
-
12 Oreos
-
White chocolate candy coating/White chocolate candy melts
-
Black Edible Marker or Liquid Icing Tube
-
Lollipop Sticks
-
Black Ribbon
-
--Baking Sheet lined with Foil
Step 1
Melt the candy melts according to package directions. Pour into a short glass. Add a dab of chocolate to the end of the lollipop stick and stick a lollipop stick into the cream filling of each Oreo. Lay Oreo pops onto the foil lined baking sheet.
Step 2
Stick into the freezer for 1 minute. Remove Oreo pops from freezer. Dip the Oreos into the white chocolate one at a time. Covering each one and tapping off the excess chocolate. Place back onto the foil lined baking sheet.
Step 3
Place into the fridge for 5 minutes or until chocolate is hard. Remove Oreo pops from fridge.
Step 4
Using an edible marker, draw Jack Skellington’s face onto each pop.
Step 5
Tie on Jack’s bow to finish the pops. Serve.
Melted Witch Bark
You Will Need:
-
Wilton Candy Melts (vibrant green)
-
½ cup mini chocolate chips (divided)
-
Pretzels Sticks
-
Mini Reese’s Peanut Butter Cups
-
Halloween Oreos
-
Hershey’s Hugs
Step 1
Begin by laying out parchment paper on a cookie sheet. Get pretzels sticks, Reese’s, Oreos, Hugs, mini chips out and ready so they are easy to grab.
Step 2
Place 1 cup candy melts in a small pot and melt on low heat stirring constantly. Once all melted spoon out onto parchment paper and spread into a circle. We made ours about 4 inches in diameter.
Step 3
Quickly add remaining mini chips to a small pot and melt on low heat stirring constantly. Spoon a tiny amount onto your green circles and use a toothpick to swirl around.
Step 4
Add Oreos as hat in the corner. Add Hugs by dipping into excess melted chocolate and adding to the top of the Ore. Add mini chips for eyes.
Step 5
Stick pretzels in your mini Reese’s and place on the opposite side of the Oreo. Let set until ready to eat. Serve.


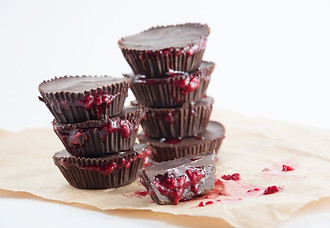
Bloody Cups -Vegan, Gluten-Free
You Will Need:
-
1 cup frozen raspberries
-
1 tablespoon rice syrup or maple syrup or agave syrup
-
1 cup + 3/4 cup (150g + 100g) vegan baking chocolate (or chocolate chips)
Step 1
Heat the frozen raspberries in a small pot on medium-high heat until soft, mash the raspberries until there are no large chunks anymore & add the rice syrup. Give it a mix and set aside to cool.
Step 2
In a double boiler, melt 1 cup of the chocolate. Meanwhile place 8 muffin liners in a muffin pan.
Step 3
Place about 1 1/2 teaspoon of melted chocolate in the muffin liners and tilt them, so the chocolate spreads to the sides. Repeat for all the muffin liners and place it into the fridge for a few minutes (until the chocolate hardens).
Step 4
Melt 3/4 cup of vegan chocolate in the double boiler. Meanwhile add about a teaspoon of the raspberry filling into the chocolate coated muffin liners (place it in the middle). Once the chocolate has melted, pour it over the raspberry filling. Tilt it a bit so the top is covered with the chocolate completely. Let it harden in the fridge for about 5 minutes. Serve.

Halloween Marshmallow Pops
You Will Need:
-
12 Campfire® Giant Roasters
-
1 10-ounce bag candy melts
-
assorted sprinkles
Step 1
Line a baking sheet with parchment paper or a silicone baking mat.
Step 2
Insert a lollipop stick into each Campfire® Giant Roaster.
Step 3
Melt candy melts according to package directions.
Step 4
Working with one marshmallow at a time, spoon the melted candy over the sides of a marshmallow and allow the excess to drip back into the bowl. Immediately coat with festive sprinkles. Place marshmallow on prepared baking sheet until the candy coating is set. Repeat with remaining marshmallows. Serve.

Gooey Monster Cookies and
Monster Suckers
You Will Need:
-
1 White Cake Mix Box
-
½ cup butter softened
-
½ tsp. vanilla
-
1 8 oz. Cream Cheese Bar softened
-
1 egg
-
Powdered Sugar
-
Food Coloring ( I used NEON food coloring to make them more vibrant)
-
Candy Eyeballs
Step 1
Beat butter, vanilla, egg and cream cheese until fluffy.
Step 2
Mix in cake mix. Divide batter into bowls for the amount of colors you want.
Step 3
Add food coloring to each individual bowl and mix until all combined. Chill for 30 minutes.
Step 4
Roll into balls and dip in a bowl of powdered sugar. Place on greased cookie sheet and pat down a bit. Bake at 350 F for 10-12 minutes. Add candy eyeballs while cookies are still warm. Let Set. Serve.
Easy Mummy Pretzels
You Will Need:
-
16 Pretzel Rods
-
1 package (16 oz.) Vanilla CANDIQUIK Coating
-
2 oz. Chocolate CANDIQUIK Coating (for eyes)
-
Piping bag (or Ziploc bag) and toothpicks for decorating
Step 1
Melt CANDIQUIK according to package directions. Pour vanilla coating into a piping bag or a plastic Ziploc bag (the freezer kind) with a small corner snipped off. (You want the hole to be somewhat large to get a thicker flow of coating. But not too large where you cannot control the flow. Nor too thin where it barely comes out.)
Step 2
Arrange pretzel rods on a large piece of wax or parchment paper. Drizzle the coating over the top ¾ of each pretzel rod, leaving a small empty space for the eyes. Serve.


